In this guide to pushing and pulling film, we will explain what it means and why you would choose to push or pull your film.
Pushing or pulling film is when you rate your film at a different speed from the one written on the box. Then, you compensate for the difference when you develop it. Pushing will mean giving the film a higher rating and pulling a lower rating. If you’re unsure about rating film have a read of our Guide To Film Speed.
Manufacturers ISO is set to achieve mid grey at the correct light reading. Keep this in mind when setting your exposure. So, you will want to overexpose your film to achieve brighter whites and underexpose to achieve full black.
Push Film
When you push film you are underexposing the film. So you give the film less light and make up for it when you develop it.
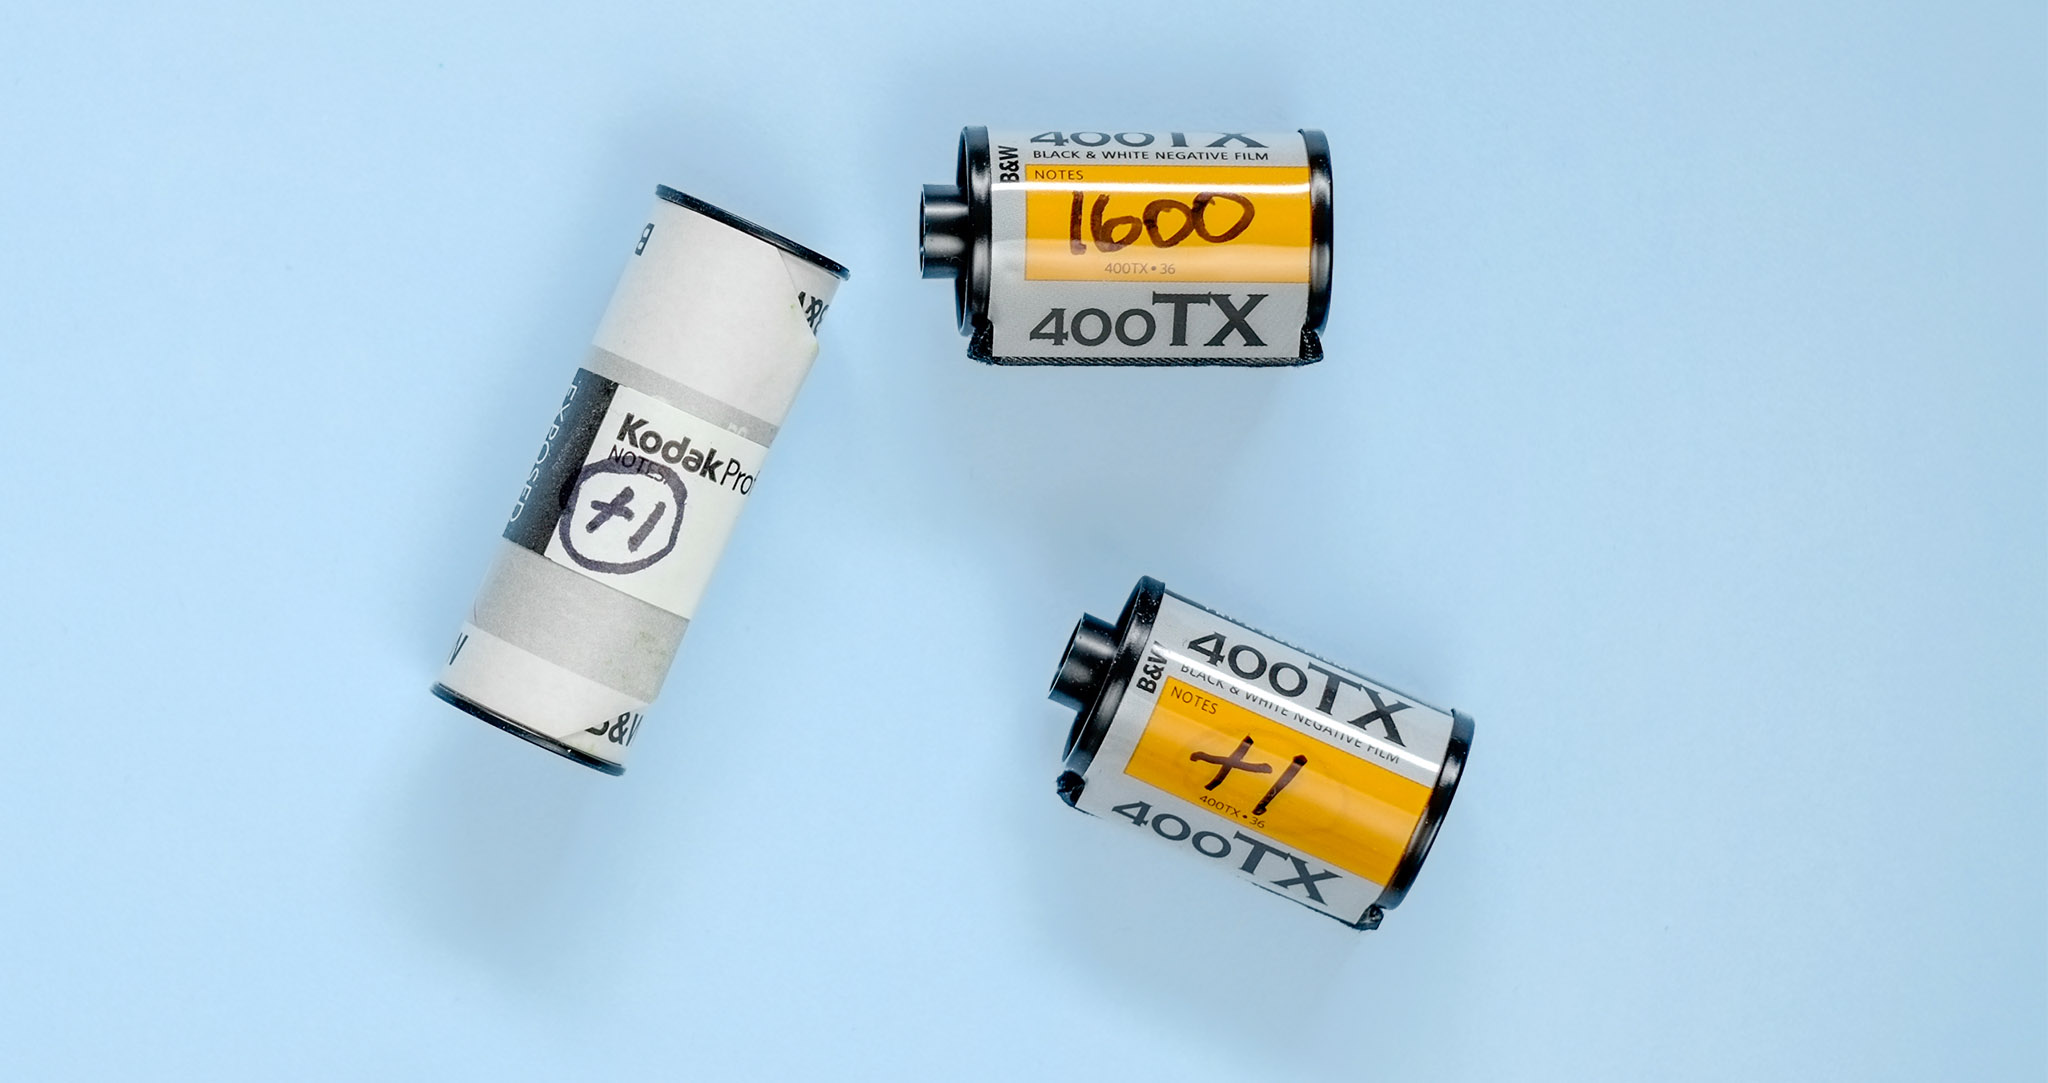
Film is pushed in stops. A stop is doubling the speed of the film. So, a 400 ISO film pushed a stop (+1) is then being rated at 800 ISO. The same film pushed two stops (+2) is rated at 1600 ISO.
Remember that when you push, what isn’t recorded on film can’t be brought back with development. You should set your ISO to get the best balance between shadow and highlight detail.
Pushing film actually refers to development. Pushing means a longer development time and increased contrast. When you tell the lab you have pushed a film +1, they will know it needs extra development.
Pushing film will give you more contrast and more grain.
Pull Film
When you pull film you are overexposing the film. So you give the film more light and make up for it when you develop it.
When you pull a film by a stop you are halving the speed of the film. So, a 400 ISO film pulled a stop (-1) is then being rated at 200 ISO. The same film pulled two stops (-2) is rated at 100 ISO.
Pulling film means a shorter development time and reduced contrast. When you tell the lab you have pulled a film -1, they will know it needs less development.
Developed Results
Ultimately pushing and pulling film refers to the development. Pushing means a longer development time and increased contrast. Pulling is a shorter development time which reduces contrast.
During normal
Tips For Pushing And Pulling Film
Pushing works well with traditional grain black and white films like Kodak Tri-X and Ilford HP5. However, it isn’t always as successful with more modern emulsions, such as the Ilford Delta or Kodak T-Max films.
Pushing colour films, like black and white, will increase the density in the
Pulling colour film will start to reduce contrast and saturation. Although C41 colour film doesn’t necessarily need to be pulled in development, as it can easily handle a couple of stops of overexposure.
As a general rule, you should expose for the shadow to capture all the detail in the darkest area of the image. The development is used to control the density of the highlights.
When pushing and pulling remember to tell the lab when you drop your film off. Some labs will charge extra for pushed and pulled
You might also be interested in our Guide to Shutter Speed and Guide to Film Speed
If you’re new to film then read our Beginners Guide To Film Photography. And if you want some help picking out your first roll then read Choose Your Film, it will give you a good idea of the options you have.
Explore
News • Guides • Community • Film Reviews • Film Developing Times • Choose Your Film

9 Comments
Join the discussion and tell us your opinion.
[…] You might also be interested in our This Is How You Shoot Film, Guide to Film Speed and Pushing And Pulling Film. […]
[…] it turned out so well, we thought we would give it another go. Except for this time we decided to push the film two stops to 1600 ISO. So, for our Second Kodak Tri-X 400 Stand Development film review, we put a […]
[…] One of the fun things about analogue photography is there is always more to learn. Now that this guide to film photography has got you started, you can find out more about different techniques. Our guides to aperture and shutter speeds will help find out more about how to control your analogue camera. You might also want to find out about pushing and pulling your film. […]
[…] Bracketing is where you take the same shot several times but change the exposure. For example, by half a stop over and under each time. If you’ve managed to get a batch of film you know has all been stored the same […]
[…] Overexpose your film. Because you are shooting through the film base you need to give your film more exposure. Two stops is recommended. So, if your original film is 200 ISO, you need to shoot it at 50 ISO. A 400 ISO film would be shot at 100 ISO. […]
[…] by the saturated colours. Interestingly, the images were also quite contrasty. This is despite overexposing the film, which would usually lead to softer colours and […]
[…] Of course, you don’t need to use a fast film, you can always push your film to a higher speed than “box speed”. To find out more about pushing film read our Guide To Pushing And Pulling Film. […]
[…] noticeable difference with pushed colour film is the extra saturation. Fuji colours tend to be bright anyway, especially the blues, but this roll […]
[…] shot it before at its boxspeed of 400 ISO. This time around we decided to take it out at night and push the film two stops to 1600 ISO. So, for our Kodak Ultramax At 1600 film review, we put a roll of Ultramax in […]